Anyone who’s been in ML for a while has had the pleasure of setting up a model only to realize that model parameters need to be passed as flags, but oh wait, there are a million parameters that need setting. Soon after, you typically realize that you could just put all those parameters in a configuration file like a YAML and then you won’t have to worry about adding all those flags anymore. In this article, we will take a look at using YAML files in C++ projects.
If you have worked in Python, you have most likely already used PyYAML before, or if you are lucky maybe you have even worked with Hydra. Of course, it’s never that easy in C++, but I’ll introduce how to do it as simply as possible so you can get to work quickly.
Prerequisites:
- You must know YAML. This guide by Ansible is pretty solid.
- You must have a docker Ubuntu environment with a CMakeLists.txt set up. If you don’t, then here’s mine.
To start off with, here is a super simple YAML file that we will be loading into our basic C++ script. It only contains two configurations, “batch_size” and “data_path”. I have saved it locally as “config.yaml”.
batch_size: 16
data_path: "data/train"
Installing Yaml-Cpp
To load this, we will need a yaml loader library. For our purposes we are using this project by jbeder. The easiest way to install it is with the linux package manager, so that is what we are going to do. All you need to do is add this line to your Dockerfile:
RUN apt-get install libyaml-cpp-devIf you are following along after setting up the Dockerfile from my previous post on setting up an environment, you could even just add libyaml-cpp-dev to the end of the RUN apt-get install statement you already have.
Adding Yaml-Cpp to Your Project
After rebuilding your docker environment, you can now edit your CMakeLists.txt file. In this file, you need to tell your project where the directories and libraries for yaml-cpp are. You can do that by adding these lines to it.
find_package(yaml-cpp REQUIRED)

include_directories(${YAML_CPP_INCLUDE_DIR})

target_link_libraries(demo ${YAML_CPP_LIBRARIES})
Keep in mind, my executable is named “demo” so make sure to change it to whatever your executable is named.
Getting YAML into your
Finally, now that Yaml-cpp is part of our project, we can actually use it in a program. First start by including it at the top of the .cpp file you want to use it in.
#include <yaml-cpp/yaml.h>Then, you can load your YAML file in your program like so:
YAML::Node config = YAML::LoadFile("config.yaml");Once loaded, access your configurations like an UnorderedMap, using the bracket and parenthesis format. Make sure to add the “.as<>()” function at the end to tell it what type to convert the values to.
int batch_size = config["batch_size"].as<int>();
std::filesystem::path datapath = std::filesystem::current_path() / config["data_path"].as<std::string>();
std::cout << batch_size << std::endl;
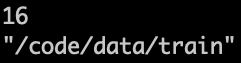
std::cout << datapath << std::endl;When I run this code, it prints the following:
For additional information on the syntax for using this library, jbeder has a nice tutorial on the github repo for this project.
Conclusion
Hopefully after this article, you see how YAML files in C++ projects can be useful to your projects. With that, you should now be able to create your own YAML files, add your own configurations and load it into your projects. This is an important part of any ML project, and having it in place can save you a lot of time fighting with flags to pass to your program.
If you get stuck or have any problems setting things up, feel free to drop a comment and I’ll help as best I can!
Fore more C++ content, check out some of my other articles!
Leave a Reply
You must be logged in to post a comment.
Connect with
Login with Linkedin